Welcome!
» Log In
» Create A New Profile
Modding an Explorer or E-Trac to make it lighter
Posted by earthmansurfer
This forum is currently read only. You can not log in or make any changes. This is a temporary situation.
|
Re: Modding an Explorer or E-Trac to make it lighter October 18, 2012 08:07PM |
Registered: 12 years ago Posts: 360 |
Earthmansurfer, don't have the time to read the entire thread at the moment (but I will soon enough here), so forgive me if these suggestions have already been covered...
I did see you want a 3 piece shaft for breakdown/transport. For that reason, your idea to use the shorter (non-tall man) Whites carbon fiber rod is a good idea. Can't really get any lighter than that. My tall man fiber Whites rod on my custom GT shaft is at least twice as long as the stock heavy fiberglass one, and yet much lighter and just as strong. Using that, I was able to shorten my upper lighter aluminum gauge upper shaft to shave off even more weight. If you are using the shorter fiber Whites rod, I would try to use a middle rod that is also of the same material. For the upper rod, there are various gauges of aluminum, though the same diameter for the most part of stock shafts, that are much lighter and will save a few more bits of weight.
Another alternative is one of Plugger's amazing shaft setups. He's got 3 piece once, and I know he has carbon fiber ones, just not sure if he has 3 piece carbon ones too. Even if he don't, I know he makes some really light shafts as well, so I'd check into what he's got product wise. Look in the Sovereign forum's accessories stickies for both the Excalibur and the Sovereign (two separate stickys), as there are a bunch of pics of his shafts and links to others you can get. I've heard nothing but good things about weight, build quality, and versatility of his various shafts. Had I not built my own I would have bought one of his.
Some told me when I set out on my project to build a light weight shaft for my GT without touching the control box, that shaving a few grams or a few ounces here or there was pointless. Well, let me tell you, as one who builds RC electronic planes and is concerned about wing loading, I knew full well that every gram or ounce I could save would all add up in the end, even if it seems pointless at the time. There is an old saying, mind your pennies and dimes and the dollars will take care of themselves.
With that mindset, I struck off to build my GT shaft, and the end result was a machine about 1 & 1/2 pounds lighter than a stock GT, and yet with far more balance and user friendly function in many respects.
Heck, even the plastic grip was heavy, and I never liked that thing in the first place. To mind my "pennies and dimes", I even ditched coil covers, as they often weight 2 to 6 ounces or so, which might not sound like a lot but at the end of a long day that much weight at the end of your shaft you are going to notice. Spraying the bottom/sides of my coils with 4 or 5 coats of spray on bedliner only adding mere grams to the coils weight compared to ounces for a coil cover.
Even the Minelab velcro straps for the coil cable were excessively thick and wide. I could save a few grams on those by using less wide/thick ones. Such was my mindset at this project.
Far as batteries go, your idea to mount the batteries behind or under the elbow is a good plan to balance the machine, but let me tell you that balance IMO should be secondary to weight. I just got lucky and found my GT balanced perfect when I was done. Hold the shaft in your hand just below the grip location. The shaft should lean forward when it balances out so that the coil is towards the ground. This way the machine's COG is putting the shaft in natural hunting position.
I would go with lipo batteries though and not worry about the balance factor, and you can always mount the battery pod further back behind the elbow to make up for the lessor weight and still balance it right, or of course use a lighter coil or do the bed liner thing to put less weight at the other end of the shaft to balance it out. Yes, the Pro coil is a extremely light coil and a good choice, but remember people are spoiled with how light it is. The 13" Ultimate is also a very light coil, especially for it's size. The SEF coils for the FBS units weight a good bit more than the BBS versions for some odd reason due to the internals, so I'd rule out the 12x10 on a FBS unit for max weight savings if that is of primary importance to you. For that reason I'd opt for either the Pro Coil or the 13" Ultimate. It's an oustanding coil thus far in my testings. I don't know if it's as deep or deeper than the 12x10 yet, and I doubt it separates left/right wise as well, but in my tests it's left/right separation is still outstanding and I can yet see no difference in that respect. As light as the Ultimate is, if you ditch the coil cover it'll still save a bit more weight. Pennies and dimes...
Far as which FBS unit to start with, I'd lean towards an SE Pro or some other Explorer as second choice over the Etrac. Why? If memory serves I think the Etrac weighs a half pound heavier than an SE if both are using the Pro Coil? That tells me there is more going on weight wise than just coil choice, unless the shaft of the SE is somehow a half pound heavier than the Etracs?
I'd for sure shoot for a 3 cell lipo. It'll be 12.6V at full charge. I use one in my GT and it's so much lighter than 8AAs. I'm only using a 750ma Rhino 3 cell series pack ($7), but run times seem just as long as the stock 1000ma boat anchor 10 cell nimh pack. Reason being? Lipos hold their voltage very high until the end of discharge, where as nimhs, like regular store batteries, drop the voltage at a much more steady rate as they drain. For that reason, I wouldn't shoot for the max capacity you want, or even try to match the stock pack's capacity. Shoot a littler lower in capacity and shave a few more grams or ounces if it were me.
A plug-n-charge simple idiot proof lipo charger is about $7 from the same source (Hobby City/King), but I prefer the $20 Accucel 6 charger they sell. Computerized with computer screen. It'll do things chargers costing over $100 won't, but you got to know what you are doing to set up and save programs. Not hard. Just takes some reading on the web about the Accucel.
I get about 2 long hunts out of my 750ma Rhinos without a low battery alarm and then re-charge. Luckily the low battery alarm on my Sovereign kicks in at about 9.8 to 10V, because lipos should never be drained past 3V per cell (9V total for a 3 cell series pack). If you don't know the low battery alarm point on the SE or Etrac you use, then a few options. 1) Plug in a $3 low battery alarm to it that Hobby King/City also sells that will sound an alarm when the voltage approaches 9V. 2) Does the Se or Etrac display the pack voltage and not just a battery icon? Can't remember. If it shows a voltage then just watch that. If it don't, measure the voltage when the icon drops to a certain point on the battery image and then note that as your re-charge point. Anything at about 10 to 10.5V or so is fine, as you'll still get super long run times, as the voltage will stay well above that for most of the drain cycle, and only fastly drops below 10V when near the end of it's drain cycle. 3) You could just pull the lipo after X amount of hours of hunting and read the voltage of it with a volt meter. Once it nears about 10V then that's the point to mark on your wrist watch to set as the alarm for time to change the battery. Overshoot the # a bit, because if you are in a real trashy area sounding off to targets (a load put on the battery due to audio/VDI response/etc), run times might be a bit shorter in an area like that versus say a large field with few targets to put a load on the detector's response outputs.
Final reminder- Good luck with your project. Just don't let people tell you that a mere gram or ounce here or there is pointless to be concerned about. It all adds up in the end, believe me. I'm even thinking about shortening the length of my coil cables and of my Digisearch meter, because both have super long cables for chest mounting to water hunt or such. Even the meter does, because that way you can keep the meter on the shaft and still chest mount the box, and so the coils do to, if you are chest mounting and don't have a meter between it and the coil.
Since the whole point was to build a light weight shaft because I don't care for chest mounting unless water hunting, I've got needless length and weight of coil/meter cable wrapped around the shaft. Again, a few ounces at best, but it all adds up. The stock 10" Tornado stays on my water shaft (stock shaft), so I only need to keep it's coil cable long enough for chest mounting to water hunt. My 12x10 is my land coil 99% of the time, only taken off to use the S-5 (soon to be replaced by an 8" Tornado) when hunting heavy trash, or for when I'm using my soon to be Ultimate when I have to send the loaner I'm using back. So all my land shafts are going to get short cables. Just long enough to reach the control box on the shaft if I don't have a meter hooked up between them, and with just enough cable length to wrap it around the shaft 2 or 3 times so that should I get a short I have extra length to cut and repair it.
Any other questions just ask and I'll see if I can help. I'll get around to reading the rest of this thread when I can and see if I have any further advice that might be worth sharing.
PS- Lipos are lighter than any other battery technology I'm aware of, even lithiums, as all the lithiums I've ever seen (that I could buy anyway) were in hard metal cases. Lipos use soft casing which saves even more weight. Even if you can find lithiums in soft casing as well, I bet you probably can't find them as cheap as you can lipos at Hobby City/King. That place amazes me with it's prices, which is why it's so big among the RC electric plane crowd. Even ordering from over seas shipments usually arrive in about a week.
PS #2- Search the modifications forum on Findmall for Explorer, Etrac, light weight, etc, because I know I've seen these kinds of mod threads come up for them in the past. I wish I could talk you into just buying a Sovereign. So much easier to modify and still be able to return to stock configuration for re-sale. Even my 3 cell lipo just sits inside the battery holder without any mods to it other than soldering in a tiny JST plug, which I can easily snip out and go back to alkalines for re-sale value.
Edited 1 time(s). Last edit at 10/18/2012 08:10PM by critterhunter.
|
Re: Modding an Explorer or E-Trac to make it lighter October 19, 2012 06:31PM |
Registered: 12 years ago Posts: 360 |
Got an Email (not from Earthmansurfer) with some charger/lipo/etc questions that might be useful here to others. Didn't list the name or the questions asked by the guy so don't see an issue with posting my response here for people. This should kill a lot of potential future questions about the lipo thing...:')
That pack should work fine (2200ma 3 cell lipo from Hobby King/City). For some odd reason they list them I guess as the average discharge voltage, but in reality all 3 cell series lipos charge to 12.6V on a charger. Whatever charger you get, just make sure it will charge at 1C or less (no more than 2.2 amps) for that size pack (2200ma pack size). Some lipos can charge at 2C or higher now but that's pushing a pack IMO. Who can't wait an hour anyway at 1C? And the math for charge rate is easier that way too.
They charge thru the balance plug but some chargers also require the power plug to be plugged into them as well to charge. Depends on the charger, like my accucel 6 wants both plugs plugged in, while my other lipo charger only needs the balance plug plugged in. In the detector, you only need to hook up the power plug to run the detector. You'd then plug the low battery alarm into the balance plug if you are using one to alert you before you hit the 9V minimum a 3 cell lipo should never be drained past.
Far as power supplies, any 12V DC source such as a car battery will work. I hacked a computer power supply on a junk computer I garbage picked for a power supply I can plug into the wall when charging in the house. Cheap and easy to do. There are how-tos on that on the web if you don't know how to do it. Nothing much involved other than putting a load (car tail light bulb) on one of the wires on the power supply to trick it it's been hooked up properly to a computer, then you just find a 12V source and ground wires to use and you can cut out all the other wires, or bring those out too for various DC power sources (like 5VDC).
Or, look under the chargers and you'll see recommended products like the power supply to use, or read the user remarks below the product (you have to scroll in that window below for that partcular charger) and see what supplies they sell that other guys are using. Mainly, you just need to find a DC power supply that can supply the desired amps of the charger in it's specs and also is within the DC voltage range (which is normaly around 9 to 14V DC or so). Ignore the watts ratings, which is just volts X amps. Much more simple to just find the power voltage window and the amps it can deliver. But as said, easy to just read what others say below the charger to use for it from Hobby City/King.
People will even tell you if you need a special DC plug for the supply or if it's compatible as is with that charger. I cut all plugs off my chargers and solder alligator clips to the leads so I can hook them up to car batteries in the field when flying RC, or to my hacked computer power supply, etc.
Below is a good simply plug and charge charger that I also have. Just plug in the balance plug and it charges. Set the amp rate to anything 1C or less. I would recommend this charger for anybody who just wants something simple. It's probably one of the most popular among the RC crowd. Built well too with aluminum case. But the sliding amp rate selector only goes as high as 2 amps. Not a big deal because that's close to 1C for that 2200ma pack, so it'll still charge a dead pack in around an hour.
1C charge rates are fine with lipos and don't stress the battery. As you can see it already has a DC plug for cigarett lighters or such, but be warned. I don't like charging any battery, lipo or not, without keeping an eye on it. I prefer a cement floor in my garage when I can't watch it or a constant eye if it's in my house. Once again, if you scroll down below it and other chargers and read the remarks you'll find what cheap DC power supply people are using with various chargers you are looking at. Or, if you have a car, trolling motor, or lawn mower 12V battery to use then that's fine too. Just re-charge that every so often to power it. Perfect solution. Their DC power supplies are cheap though.
[www.hobbyking.com]
If you don't mind a little reading/research, I'd get the $20 computerized Accucel 6 charger instead. It'll do lipos, nimhs, nicads, lifepo, and a few other battery types. You can set exacting amp charge rates, cycle packs nimhs/nicads, put a lipo into a sleep charge (correct voltage for best long term storage for months...Also...stick them in a refrigerator in a fire proof metal box as that prolongs life best for months/years too). You can save battery programs for various packs/types/etc. Really great charger. It's big in the RC world. The manual is on Hobby City's site as they don't mail it with it, and there are tons of threads on the web on setup/use for a novice to understand it. Once set up you never have to touch it again. Only precaution to be sure about- Make sure the lithium type is set right (fire hazard), make sure the cell count is set right (also fire hazard), make sure you don't charge higher than 1C, and make sure you use the BALANCE charging mode and not the regular non-balancing mode it always defaults to on power up. if in a hurry, use the fast charge mode. It doesn't charge faster, it just cuts out the long low amp end of the charge that doesn't add much more capacity to the pack topping it off. Great for in a hurry.
For nimhs/nicads, set the m/v threshold setting for nimhs at 5 to 7 m/v. For nicads 12 to 14 m/v. Don't listen to some of the yahoos setting it too high as that could miss a nimh/nicad's peak and over charge it. I know by experience. Also, don't rely on the auto charging functions for nimhs/nicads. Doesn't work well either. Same deal with nimhs/nicads. For long battery life no higher than 1C, and in fact in those 1C can be pushing it, unlike lipos, so I usually shoot for 1/3rd to 1/2 C at the most. If a nimh or nicad is ever hot then you are charging it too fast. Heat destroys battery life. If a lipo is ever hot then something is seriously wrong like too fast a charge rate. If you look in the battery sticky in the Sovereign forum I posted a thread link where I walk you thru every step on setup of the settings on the Accucel. You'll know you found the right thread when it's direct and to the point (for once) on settings. :') I think I listed it as such in the sticky thread link.
If you are draining a nimh/nicad dead to excercise it, don't use the discharge function on the charger. Takes too long due to being limited by the charger's watts limits. Better to drain via a car tail light bulb. Even nimhs benefit from excercise to increase capacity like nicads did for memory problems. You can also save a bad pack this way. Drain it until the bulb goes out and then another 20 minutes to insure all cells are completely equal in drain, as often nimhs/nicads can get badly out of balance with each other. Cycling them 4 or 5 times like this will increase capacity or even bring a bad pack back to life.
Sometimes they build up resistance crystals in the cells which a slow charge rate won't bust down. I'll charge at say 1 or 2C or so to bust that out of them. Some even got as high as say 5C or so to insure they bust the crystals down. I'll do that as a last attempt to try to save a pack, but only for maybe 5 minutes. Very risky. Wear goggles. Explosions can happen. A few minutes at that high of a rate and I don't risk any more and charge at 1C or less from there on out. Once charged a time or two at 1C or blast charged a few minutes higher, regular charge/discharge at 1C or less for further excercise. With a charger like the Accucel 6 that displays capacity you can gauge how the pack is recovering (or not) by watching that. Continue to cycle until you don't see gains in capacity after say 2 or 3 cycles in a row. Usually takes about 4 or 5 to hit the wall in terms of gains.
I've saved things like cordless drill packs that have sat dead for years and the charger the drill came with won't recognize to charge. The accucel will ignore that and force them to start charging. A good 1C or so blast charge a few times, then slower 1/2 to 1/3rd C or so for the rest. If it isn't coming back to life then blast it at 2 to 5C for a few minutes (wear protection and be careful) and then back to 1C.
Back to lipos for the project...
Also, I wouldn't go capacity crazy when shopping for lipos. If weight is of primary concern I'd shoot a bit lower than stock capacity of the nimh pack. A higher capacity lipo will still be much lighter than 8AAs, but even a lipo with a bit less capacity will probably give you longer run times than a stock nimh rechargeable pack, due to lipos holding the voltage very high until near drained. They hover around 11 to 12 volts for most of the drain. Once they reach 10V then they are near dead and start dropping voltage fast after that. That's why if I were timing run times without a low battery alarm on your detector that is lower than 9V that you could rely on, and if you aren't using their cheap plug in low battery alarm for the lipo, then once I read 10V for the lipo with a volt meter I'd use that as my longest run time in the field. In fact, I'd shoot for about 10.5V to be safe, as different sites with higher trash puts more load on the battery amp draw for faster draining/run time.
As said, once a lipo hits about 10V it's going to drop pretty quick in voltage, although detectors have so tiny of amp draw (well below 1 amp), that even then you'd probably get hours of run time before it went below 9V. Better to be safe than sorry though and underestimate your estimated run time just to be safe if you aren't relying on the detector's low battery alarm or a plug in alarm. If you use a plug in alarm, don't leave it plugged in. Sure, it might take months to drop the lipo below 9V, but if it's in storage and you aren't around to hear it you'll destroy the lipo.
|
Re: Modding an Explorer or E-Trac to make it lighter October 19, 2012 09:44PM |
Registered: 12 years ago Posts: 61 |
|
Re: Modding an Explorer or E-Trac to make it lighter October 20, 2012 08:41AM |
Registered: 13 years ago Posts: 1,445 |
The supplies are coming along, so far this is what I have or is on the way:
Batteries: "Portable 12V 2800mAh Rechargeable Li-ion Battery for CCTV " - Cost 20 Euros or 30 bucks in the states w/ charger. Very small pack at 3" X 1.7" X .4". Not sure on the weight but obviously a lot ligher than the stock. [www.ebay.com] I also have some aa batteries should I go with them for balance reasons. If so, then consider 2X 4AA battery holders with the "9v" snap on side - The snap on part makes it easy to attach and detach from the battery box. They cost like 3 bucks and you might want to find some that say for rechargeable as they should be slightly bigger which avoids cracking should you put rechargeables in the alkaline packs - which is doable. Of course have two more 9V snaps with wires wired inside the box to the detector (in serial to get 12v) to attach to. If you are curious the wires I ordered from Whites are "2 x 12v Snap-on Battery Lead (520-0018) = USD $3.98" They have the 9V connectors to join to the two battery boxes.
Battery Box - Will have to go with a hobby box style like Keith did in his XS mod. Look for a waterproof version. The 1266 battery box is too hard to find.
Rods/Shafts - X-Terra 705 upper, straight Whites mid (14.5” rod, part number 500-0288-1), Whites 23" FIBER LOWER SHAFT - All cost like 100 bucks in Europe, less in the States.
1/4" Mechanical Head Phone Jack - Whites "Stereo Headphone Jack (520-0140-1) = USD $4.95"
5 pin Male Mic Jack - Readily available online, just get something that has the right plugin setup, easy to match from pics. Cost is like 2 bucks. If you didn't know you need to replace the old one. Thanks Rob for bringing this to my attention, as well as a host of other things he has shared and I will share here as I document the dismantling and then mod assembly.
A note - As it has become apparent, the BIG difficulty is removing the glue from the pod to the handle. You can try some CA Debond to remove the crazy glue - I have some on the way. Quality and formula vary from brand to brand - not sure which is best. Might have to be creative to get the glue in there and such. The commercial grade if you can find it is superior I have read. You can also try liquid freeze to try to break the glue joint but as Rob told me you risk breaking the plastic. Also, heat, or alternating heat and cold is possible, but perhaps risky to the plastic and IC's if you get too close.
Albert
ps - Thanks Critter for the suggestions.
|
Re: Modding an Explorer or E-Trac to make it lighter October 20, 2012 01:06PM |
Registered: 14 years ago Posts: 3,948 |
De-walt sells a heat gun where you can set the degrees. My son uses one to soften the glue, as to remove the soles on sneakers. After he softens the glue, he uses fishing monofiliment line in a sawing action to seperate the sole. Not sure it will remove the glue used on the detector though.
|
Re: Modding an Explorer or E-Trac to make it lighter October 20, 2012 05:48PM |
Registered: 12 years ago Posts: 360 |
Here's a bit (bit?) more info I sent in a Email that might be of help to others. To the guy I sent this Email to, you might want to skim through it, as I added more content in this one I didn't send you in yours...
Send me a link to the pack again and I'll look it over. I'm guessing it's a transmitter pack and has a transmitter plug on if of one of two types. Usually lipos are set up this way: They have a white balance plug (a wide plug with all the cell leads coming out to charge/monitor them individualy). I always called those "Molex" plugs myself, as I think that's the correct original name for them despite what they are called these days. "Balance Plugs" are all standardized on lipos now with only a few rare exceptions. They only vairy in size due to it being a 2 cell, 3 cell, 4, etc...so that all the leads come out. Most chargers have ports for all those various size Molex plugs right on the side of them to plug them into.
The power or "discharge" lead, which is always going to be just two wires (neg and positive for the entire pack as one in series) are usually one of two types- Either they are JST plugs (tiny little plugs, usually red in color) for amp draws below I think about 15 amps or so, or if the pack is designed for higher amp draws of the plane it'll have what is called a "Deans Ultra" plug on it, which is a bigger plug which is also usually red. Those are the two standards for power leads in RC.
I prefer the little JST plug on my low amp draw planes (or my detector), where as on my planes that draw large amp draws I use the Deans Ultras. If that pack is intended for a transmitter then it's either one of two types of plugs radios like JR and such use. I don't know off have which is what on those, but they are different than JST or Deans, so send me a link to the pack and I'll see if I can ID it and what kind of male plug you need for the detector to plug into the one on the pack.
Good time to point that out...If you change plugs on a pack (which you shouldn't have to do, just get a pack with the right plug, or the right male for the detector to match it), ALWAYS only cut one wire at a time, solder to new plug and shrink wrap it first to isolate it, then cut the other and do it. If you cut both wires at once that causes a short, and if you unhook both wires at a time you are asking for trouble. As experienced as I am soldering and such, ask me how I know. :') Also, females always go on the packs, males always on what plugs into them, so that there is less risk of the battery shorting with a female plug when it's sitting around.
Another sidenote: One of the two types of transmitter pack plugs various radio transmitter companies use is also the same kind used in many cordless home phones to plug the battery pack into, so if you've got a junk phone around check for a male on the battery. You can also head up to radio shack and ask to see the junk batteries people brought in to recycle and scarf one off of one of those. A pack of male plugs is so dirt cheap though at Hobby City/King that it's pointless to not just buy the right ones from them for the pack you intend to use.
Also, some chargers only need the balance plug charged in to charge them, while others want the power lead also plugged in at the same time. And yes, only the power plug would plug into the detector. The balance plug you'd then plug into your low battery alarm if you bought one I think. Never looked at those but I'd assume that's what they plug into.
Final thought for now. If your intentions are to lose weight, don't go capacity crazy. Although lipos are very light, save as much as you can and undershoot the stock pack's capacity a bit for max weight savings. For instance, my stock boat anchor rechargeable nimh pack for my GT is 1000ma, so I just bought a 750ma Rhino 3 cell series pack. Run times seem just as long to me as the stock pack due to lipos not dropping the voltage as fast as they drain, thus hitting the low battery alarm on my GT at around 10V later during the discharge cycle. Instead of going capacity crazy, just buy a second pack. For about $14 I got two Rhino packs. They are so much smaller, lighter, and more compact/easy to carry than 8AAs, that if I'm worried about my first pack hitting the low battery alarm on a hunt far away from my truck, I just throw the other one in my shirt pocket. Just never put it in a pocket with keys or anything to risk a short. Bad news...
And I'll leave you with this for now...Lipos had a bad reputation about 7 or so years ago when they first started getting popular in RC. They often caused fires, but usually because they didn't feature balance plugs or chargers with balance ports. Cells would get overcharged and then bad things would happen. These days you hardly hear of any fire problems with them because of that. Even if you drain it past 3V per cell it shouldn't catch fire (I have), as that's the way they are supposed to be disposed of- draining dead. IMO Lipos are no more unsafe than any other battery type. In fact, due to the balance charging I feel they are safer than many other batteries these days. I've had nimhs go nuclear on me charging due to the cells being badly out of balance. No risk of that with a lipo charging in BALANCE MODE on a charger.
I saw one guy (ain't going to name him) pushing lithium ions (LION) trying to scare people that lipos were very dangerous and would also explode if they got wet. Truth is ANY battery I'm aware of with lithium in it, which both have, will explode or catch fire when the internals contact water, or even just the moisture in the air if they are punctured/cut. So long as the pack is not cut/broke open, if it takes a bath in water there shouldn't be any risk of that. If it's got a rupture you'll know long before it hits water that you've got a major issue on your hands. Any battery, lithium based or not, is a fire risk. Just like gasoline is. Gasoline isn't "safe", but with a few precautions the risk of fire or explosion is low. Same deal with batteries. Don't abuse them, cut them, short them, overcharge them, charge too fast, or try to draw more amps from them then they can handle...And they are as safe as handling gasoline. Anybody who does something stupid is one less person to pollute the gene pool far as I'm concerned. :')
As always, use my advice at your own risk. I don't claim to be an expert on batteries/chargers, and opinions vary wildly in battery care on the net. I just know what *seems* to work for me...
Edited 1 time(s). Last edit at 10/20/2012 05:49PM by critterhunter.
|
Re: Modding an Explorer or E-Trac to make it lighter October 20, 2012 06:44PM |
Registered: 12 years ago Posts: 360 |
Hey Earthmansurfer, final thought for now...Since you are not using the stock battery holder why not just velcro the battery to the bottom of the arm cup and not mess with making a holder for it? On some of my RC planes that are very light and don't have a body (just a carbon tube as the "fuse"), I just velcro the lipo right to the carbon arrow shaft I used right where I needed to to get the center of gravity right for the wing.
Also, far as going Etrac or SE. Like I said, the SE is a half pound lighter. I wouldn't worry about performance versus the Etrac. If you know of a few of the experts who own Explorers and read their comparisons, the SE is just as good on deep or masked silver. Some say the audio at depth on silver is better too. Just a bit less user friendly to some people, but I've found the Etrac to me no more "friendly" than my Explorers were. You just have to know the machine. I much prefer the VDI setup on the Explorer. Never cared for the 12th line compression thing on the Etrac/CTX myself. Seem to get more info out of the smart screen on the Explorer.
And if you read Bryce's field comparison of the CTX and SE, the SE held it's own and then some in his opinion. Even 2 or 3 CTX guys said he was able to see a barber dime I think with his SE that they couldn't hit. Just saying the SE will hold it's own against anything if the guy using it knows what he's doing and how to set it up/use it. Also, some say even the prior Explorers will do just as well as an SE in depth/separation provided you are using the right coil (like a 12x10 for instance). Reason why I'll be adding another Explorer to my ranks of machines, an SE only for the better PPing setup over the prior models, but I'm not going to stick with the Pro Coil on it.
Dirty rotten shame Minelab stopped making the Explorers, let alone my beloved GT...
|
Re: Modding an Explorer or E-Trac to make it lighter October 20, 2012 07:09PM |
Registered: 13 years ago Posts: 1,445 |
Critter - If any moisture gets on that battery that is velcro'd on, that could be bad. Also, I want the weight to be as far back as possible to offset the coil weight as much as possible.
I got the E-Trac completely dissasembled today, was a piece of cake. If people knew how easy, many others would have already made this mod. But my Pod/control unit was NOT glued to the rod. I'm going to work on posting some pics with what I did now, so look out. The next "hard" part will be mounting the Pod on the X-Terra 705 handle. Might have to make something to join them up.
Albert
|
Re: Modding an Explorer or E-Trac to make it lighter October 20, 2012 08:04PM |
Registered: 13 years ago Posts: 1,445 |
Ok, as stated above, I was able to take apart the E-Trac. All the wires and such are completely intact - NO CUTTING (yet). All said and done it took less than 30 minutes. I'll walk anyone wishing to take their E-Trac apart for a mod now:
1. Remove the battery.
2. Remove lower and middle stems, elbow cup and cut off foam grip on handle (unless you want to use soapy water and try to slide it off the back, I decided not to.)
3. Remove Pin from under Pod. You can do so by pushing it out, with great force, using a narrow screwdriver and then using a pliers at the end. (You need to remove the pin to slide the pod off rod later.) Here is the pin, partly pushed through.

4. Remove red "stabilizer/lock" or whatever it is called from the middle rod locking area, where the pin is basically located that you just removed. It practically falls out with a screwdriver. This also stops the pod from sliding off and must be removed.

5. Remove 4 screws from back of pod/faceplate. Here is pic of screws.

6. Then pull the face slowly off towards you. (Note - the faceplate pulls off, not the back) The wires can reach 3" or 4" no problem, but don't pull on them. (the foam grip is in the way if you haven't already cut it off). Big white wires are the coil wires. Other wires mentioned in step 7. Pic:

7. Now, pull off the two plugs on the right side shown above. They are for the speaker and the (power & headphone jack). The pull off very easy, but are on to fit tight, to make good contact. Pic of the plugs removed:

8. Start slowly wiggling and moving the pod off the rod. I just worked and wiggled it really slowly. It was off in just a couple of minutes. Good advice kieth gave me here. If yours is glued on, I think some CA debonder would help get it off.
9. Remove the 4 larger screws from the side of the E-Trac upper rod / arm. Remove the 2 small screws holding the stand on as well. You can safely take off the rest of the side plate now. Remove the stand and small metal square used to hold the arm cup on.
Here is how things should look now.

10. Now pull out the coil plug - it slides right out, easy. SLOWLY start to remove the wiring from the plastic crevice it is laying in. It is glued in places as you can see in the pic. That glue can and should be scraped off. It is soft glue and comes off easy. The wires pull out pretty easy. There was a lot of glue in the 6" or so area above the headphone jack. You want to separate the glue with a small screwdriver or the like here. Then the wire will come right out. The headphone jack and power spring thing slides right out, just like the coil plug. (Put a piece of tape around the headphone jack as it is in two pieces and will separate.) Here is the opened E-Trac pod with the one piece wire there.

11. Reassemble the Pod (plug in the two plugs you earlier removed). The cable plug sits safely in the area where the E-Trac's middle rod was. I imagine we can hot glue it there for the mod (that way you can easily take it off and for an E-Trac stock reassembly should you need to). This is as far as I got so I will stop with the mod here. (You should also reassemble the upper rod, keeps everything together nicely) Set the thing I called a "stabilizer or lock" and pin in a safe place.
It looks like we can re-use the headphone jack, depending on how and where we want to put it. The coil connecter looks like it is fine where it is and can be re-used as well.
Here are the weights of everything. I will use this to later compare against the new parts.
Pod - 14 ounces
Upper plastic Rod/arm - 14.3 ounces
middle rod - 4.44 ounces
lower rod - 4.16 ounces
battery - 8.82 ounces (yes, half a pound)
stock coil with cable - 1lb 2.6 ounces (This to me is a big part of the balance problem. I wish Detech would make a light replacement.)
Total - Almost exactly 4 pounds. Unfortunately, as stated above, the coil is heavy. But, the rear plastic arm is also a bit up there and the weight is spread evenly along it, as is the battery weight. Saving weight here and putting the replacement batteries at the way back end, like in Kieths mod linked on the first page, should really help with balance and weight. We will find out. Waiting on a few more parts.
Albert
Edited 1 time(s). Last edit at 10/20/2012 09:30PM by earthmansurfer.
1. Remove the battery.
2. Remove lower and middle stems, elbow cup and cut off foam grip on handle (unless you want to use soapy water and try to slide it off the back, I decided not to.)
3. Remove Pin from under Pod. You can do so by pushing it out, with great force, using a narrow screwdriver and then using a pliers at the end. (You need to remove the pin to slide the pod off rod later.) Here is the pin, partly pushed through.
4. Remove red "stabilizer/lock" or whatever it is called from the middle rod locking area, where the pin is basically located that you just removed. It practically falls out with a screwdriver. This also stops the pod from sliding off and must be removed.
5. Remove 4 screws from back of pod/faceplate. Here is pic of screws.
6. Then pull the face slowly off towards you. (Note - the faceplate pulls off, not the back) The wires can reach 3" or 4" no problem, but don't pull on them. (the foam grip is in the way if you haven't already cut it off). Big white wires are the coil wires. Other wires mentioned in step 7. Pic:
7. Now, pull off the two plugs on the right side shown above. They are for the speaker and the (power & headphone jack). The pull off very easy, but are on to fit tight, to make good contact. Pic of the plugs removed:
8. Start slowly wiggling and moving the pod off the rod. I just worked and wiggled it really slowly. It was off in just a couple of minutes. Good advice kieth gave me here. If yours is glued on, I think some CA debonder would help get it off.
9. Remove the 4 larger screws from the side of the E-Trac upper rod / arm. Remove the 2 small screws holding the stand on as well. You can safely take off the rest of the side plate now. Remove the stand and small metal square used to hold the arm cup on.
Here is how things should look now.
10. Now pull out the coil plug - it slides right out, easy. SLOWLY start to remove the wiring from the plastic crevice it is laying in. It is glued in places as you can see in the pic. That glue can and should be scraped off. It is soft glue and comes off easy. The wires pull out pretty easy. There was a lot of glue in the 6" or so area above the headphone jack. You want to separate the glue with a small screwdriver or the like here. Then the wire will come right out. The headphone jack and power spring thing slides right out, just like the coil plug. (Put a piece of tape around the headphone jack as it is in two pieces and will separate.) Here is the opened E-Trac pod with the one piece wire there.
11. Reassemble the Pod (plug in the two plugs you earlier removed). The cable plug sits safely in the area where the E-Trac's middle rod was. I imagine we can hot glue it there for the mod (that way you can easily take it off and for an E-Trac stock reassembly should you need to). This is as far as I got so I will stop with the mod here. (You should also reassemble the upper rod, keeps everything together nicely) Set the thing I called a "stabilizer or lock" and pin in a safe place.
It looks like we can re-use the headphone jack, depending on how and where we want to put it. The coil connecter looks like it is fine where it is and can be re-used as well.
Here are the weights of everything. I will use this to later compare against the new parts.
Pod - 14 ounces
Upper plastic Rod/arm - 14.3 ounces
middle rod - 4.44 ounces
lower rod - 4.16 ounces
battery - 8.82 ounces (yes, half a pound)
stock coil with cable - 1lb 2.6 ounces (This to me is a big part of the balance problem. I wish Detech would make a light replacement.)
Total - Almost exactly 4 pounds. Unfortunately, as stated above, the coil is heavy. But, the rear plastic arm is also a bit up there and the weight is spread evenly along it, as is the battery weight. Saving weight here and putting the replacement batteries at the way back end, like in Kieths mod linked on the first page, should really help with balance and weight. We will find out. Waiting on a few more parts.
Albert
Edited 1 time(s). Last edit at 10/20/2012 09:30PM by earthmansurfer.
|
Re: Modding an Explorer or E-Trac to make it lighter October 26, 2012 05:03AM |
Registered: 11 years ago Posts: 14 |
The last trick I tried with my Quattro is to make the armrest band shorter an rest the elbow UPON it,
It works a bit (different grip angle), but still, my arm can't stand it too long.
Minelab has been wrong with those designs for years, people have been inventing and ... exploring lol different ways to make the detectors lighter, and Minelab just watch and won't listen to their customers.
Now they bring out the CTX 3030, and its an even worse design.
At the same time, they stop with the Sovereign, the only one that is correctly hip mountable (the Excal is INcorrectly hip mountable lol).
I'll never understand the philosophy hiding behind all this.
HH
JIm'
|
Re: Modding an Explorer or E-Trac to make it lighter October 26, 2012 06:35AM |
Registered: 14 years ago Posts: 8,155 |
Not sure of the batteries you are going to use Earthman ..but if you use the setup I did remember to connect in series...
Be careful removing the rubber boot....I used dikes and snipped slow...mark your wires for the pins they go to on the connector you can get messed up quite easily if you dont...dont cut the wires unsolder them off the connector....Heres Why.....you need as much wire as you can get because the connector you are going to use is going to be the type that mounts on the outside and the screw is on the inside to hold it on...So you will have to feed the wired through the hole in the case you make for the connector mount..solder on the outside then slid it back in....
Drill hole in case...
Put chokes back on wires if applicable,,
Slide nut over wires.
Slide star washer over wires ...Solder ground strap to that star washer...
Feed wires outside case through hole drilled for connector...Solder wires to connector pin's on outside of case..Make sure they are clean solder joint's...dont splatter solder and short pin's..
push connector back inside case.
then place the star washer over the threaded connector then the nut....then tighten it down without turning it..Keep it aligned and tunr the nut..it will be hard to do and once it's tight you need to tighten good and tight..Needle nose work well...it's a tight spot to work in...Very annoying...but dont let it spin..you could break the wires....I plug a dummy in the jack to hold it with from the outside...GET IT TIGHT FOR PROPER COIL GROUND will reduce falsing...
There is a company that used to make the connectors that mounted from the inside with the nut on the outside but they are hard to find...I had one left and dont know where to get more...If you can find one it sure is easier....Ham radio suppliers are where to look...But the type you have is fine just more tedious..
Be careful...you can smoke that machine very easily though....
Wish I could remember the layout for the headphone jack...Wire it wrong and the speaker wont shut off ..or the headphone's wont work,..I had trial and error to get mine working right...One thing I noticed ,once I was done is the volume was way louder than it was in the stock configuration...I wonder if Minelab did not use some resistance inside their stock headphone jack....
Have you ever noticed on a stock explorer that when you have headphones plugged in you still barely hear the external speaker?
well after the mode I did not hear that no more and the headphones were louder...I think they use a special jack maybe.
Keith
|
Re: Modding an Explorer or E-Trac to make it lighter October 26, 2012 04:15PM |
Registered: 13 years ago Posts: 1,445 |
Jim - I thought they got the balance right with the CTX but they got the weight all wrong and the bulkiness. Also, didn't help me that it broke down in 2 pieces and not 3. If I get the balance perfect with the E-Trac I will have to use the strap, like on the CTX. (But getting the bance perfect I don't think is possible unless there is extra weight at the back.)
Keith - Not sure on the batteries myself. I have the li-ion coming and already have 8aa's as well as two "square" battery holders. I might go with the aa's over the li-ions if the balance is better. We'll see.
I am not sure regarding some of what you wrote, but thanks for writing it ;-) The rubber boot? What rubber boot?
We are both clear on unsoldering connections instead of cutting. (When I saw my neighbor work on my pro-pointer that is when it first hit me.)
Choke - I only have one. Should it be inside the pod? I think that is where it was to begin with but I forget.
I don't understand what part you are talking about with the star washer. I don't remember seeing that. I am not cutting the coil connector off, if you are talking about that. (So, I don't need to re-hook up a ground then.)
As far as the battery box, I think I just sold the wires up (in serial if I am using 2X the 4aa battery holders. I don't see how I can fry the machine (and I'm not touching the coil connector)? I'll be careful to hook that red wire to the pos and black to the negative.
I am re-using the headphone connector I think. The wire lengths, even if I forgot which was what, clearly shown by their lengths, point to where they connect (as their is a short, medium and longer wire - lining up with the headphone plug.) But thanks for the mention, should I use the White's one, I'll label the connectors. (I hope the White's one comes with a diagram or the like. hmmmm)
And yes, I do think I noticed the speaker slightly on, but that was on my E-Trac. Maybe I just have bad memory...
I will be uploading some pics of the top of the X-Terra 705 handle and the bottom of the E-Trac pod this weekend. Maybe you guys have some ideas on joining the two. There are quite a few possibilites. Though I am leaning towards an aluminum piece joining the two.
Thanks,
Albert
|
Re: Modding an Explorer or E-Trac to make it lighter October 26, 2012 05:43PM |
Registered: 14 years ago Posts: 8,155 |
I just now looked through your post Albert...
I thought you were going to mount the connector to the housing like the mod I did..
But I see you are just going to leave it somehow hooked up outside the housing in the original state....Thats the rubber boot I am talking about...
I P.M'd Robert the other day about where to get the coil connectors ..pretty cheap...And I saw you talking about it so i thought you were using one...My mistake...
I was going a different way with the Mod..than you were ..I was 180 degrees out from you LOL!!
And yes you will possibly be able to use the stock headphone if you can mount it...
I believe you are wanting to keep the explorer mod in such a way to get it back to original if you want?
Keith
Edited 1 time(s). Last edit at 10/26/2012 10:11PM by Keith Southern.
|
Re: Modding an Explorer or E-Trac to make it lighter October 26, 2012 09:59PM |
Registered: 13 years ago Posts: 1,445 |
Ahhh, good. You really had me a bit worried as I thought I was missing something. But I much prefer the "better be safe than sorry" approach. And hopefully others reading this thread are helped along - we got all bases covered 
My idea is to use a glue gun from my neighbor to secure the coil connector to the inside of the opening where the E-Tracs shaft once was (It looks fine there). It actually lays against it nice and some of that tacky and strong glue would be
perfect and also allow to revert things should I want to (So yes, I will try anyway, to have the mod "reversable". I'll add a rubber seal of some type to close up the opening where the wires come out from the pod. I did end up ordering a coil connector and headphone jack - ordered those before I had a plan, but will be
good to have around should I want to change the mod, or need to.
The headphone jack looks like it will also be a good candidate for the glue gun but I also have to secure the two halves together as there is nothing holding the halves together. I imagine it is like on the Explorer - on the E-Trac
the two pieces slide into a slot and that holds them together, along with brining the arm halves together.
Thanks,
Albert
|
Re: Modding an Explorer or E-Trac to make it lighter October 27, 2012 05:43PM |
Registered: 12 years ago Posts: 360 |
A bit more on lipos/chargers that I got asked in a PM which might be helpful to those considering going lipo on a detector...
This lipo he's considering...[www.hobbyking.com]
You want to use the matching male plug they sell to mate with the power lead on that pack to hook it up to your detector. You'll also need one to charge it depending on which charger you pick (read below).
As for a charger, I see that battery is capable of a 2C charge rate where as most lipos are only rated 1C for fastest charging rate. At 1C it's 2.2 amps, at 2C 4.4 amps. I would still highly recommend you only charge at 1C. It makes for easier math as to the amp rate and still only takes about an hour on a dead pack. 1C is fine for lipos and won't shorten their life. 2C I suspect might, as that's a very new thing. If you want to only charge at 1C and want a simple plug-n-charge charger, use this one, as it's very popular among the RC crowd for a simple charger...
[www.hobbyking.com]
It will do a 2 amp charge rate= about an hour. You also don't need to hook up the power lead to charge it, just the balance plug plugs into the side of the charger and it automatically starts the charge. If you want a better more versatile charger get the Accucel 6. By far it's the most popular charger out there among the RC crowd and will do things a charger costing over $100 won't. It does require reading/learning though to know how to set it up.
This charger though requires both plugs plugged in to charge. Use the balance mode for normal charging, or the fast mode (which still balances) for faster charging by way of it cutting out the low amp at the end to put the last little bit of capacity into the pack. Helps if you are in a hurry by saving say about 20 minutes off the charge time. Doesn't increase the amp rate, just cuts off the end of the charge that only puts another few hundred MA of capacity or so into the pack.
Another great feature of this charger is it's sleep mode. If you plan to store a battery for months then put it to sleep with that mode for best health on long term storage. Also, throw it into a fire proof box (paint the inside so it won't short) in the refrigerator. Also, this charger displays the capacity of the pack. Useful for monitoring pack health or how long the charge still has to go.
Good luck!
Edited 1 time(s). Last edit at 10/27/2012 05:45PM by critterhunter.
|
Re: Modding an Explorer or E-Trac to make it lighter October 27, 2012 07:16PM |
Registered: 13 years ago Posts: 1,445 |
Here are some pics of the next challenge. The first is the top of the X-Terra 705 Handle. The next two are a head on shot of the bottom of the E-Trac pod and one at an angle (to give some depth perspective). What do you all think is the best way to join the handle to the pod? I am leaning towards an aluminum piece in between the two. Note - The plastic piece at the top of the handle is an insert. The two screws you see are screwed into a partial channel - meaning if I was to take that insert out and just screw directly into the two partial channels, there would be risk of stripping, so I will leave the plastic insert screwed in.


|
Re: Modding an Explorer or E-Trac to make it lighter October 28, 2012 12:26AM |
Registered: 15 years ago Posts: 1,852 |
|
Re: Modding an Explorer or E-Trac to make it lighter October 28, 2012 12:58PM |
Registered: 13 years ago Posts: 1,445 |
Thanks go-rebels. Here is a picture of the inside of the handle and the two partial channels. The plastic insert is somewhat visible in the pic also, but out of focus. Just taking it out and putting it back in again, one of the screws had trouble going back in, so I really don't think I will be taking it out again. Fabricating something out of aluminum or plastic is probably the plan.

|
Re: Modding an Explorer or E-Trac to make it lighter October 28, 2012 01:28PM |
Registered: 15 years ago Posts: 1,852 |
This Xterra handle will be tough to adapt... the 'holes' are just extruded open plastic channels and offer only 75% thread engagement at best. That's why the screws are tough to re-insert; they will tend to angle and walk out the open side of the extrusion.
The oval shape doesn't help either. Can the Xterra handle be removed and replaced with something more user friendly?
I was hoping that the adapter could be made in one piece but I see a few solutions if a two piece assembly can be fabricated. In one case you'd fit a rectangular plate over the top of the handle screwing it down through the extruded holes. The plate would extend toward the detectorist another inch. A raised rectangular cross section (bar stock) would be screwed/glued/welded to the plate and have a pair of cross-drilled holes into it that would fit between the tabs on the Etrac housing. Another pair of holes would need to be cross drilled through the Etrac tabs. Then mount the Etrac to the bar stock with a pair of screws.
The adapter plate could be milled from a larger bar stock (one piece) if one had access to a metal cutting milling machine.
Understand Albert?
|
Re: Modding an Explorer or E-Trac to make it lighter October 28, 2012 05:39PM |
Registered: 13 years ago Posts: 1,445 |
I can't replace that handle, it is welded on. I will just go with the original plan of mounting to that plastic bit. I can probably get a pretty good connection if I drill into the plastic. Regardless of those 2 screws, it is a very tight fit. And, there is also a hole in the side of the handle to put another screw in to secure that plastic insert.
I think I follow you and our ideas are very similar. I had thought of using the two holes at the bottom of the pod (where the clamp once was to hold the shaft in) as a way of securing to the aluminum "bracket" that I will create. The holes are there so I might as well try to use them as you said, my plan as well. Then I would have the aluminum bend up and cut to be shaped like an upside down "U" - to fit up against the E-Trac's pod (where the original upper rod inserted into). I could add a flange/tab (piece 2) and put two more small screws into the pod (where you wouldn't see them should I hook it back up to the original shafts.)
Since I have Winter to work on this, there is no rush. I should probably fabricate something out of balsa wood, some light plastic or the like to give me an idea of how things will go...
I have to check, but I think a few of my students are machinists and might be able to work on something for me - but this might not be possible, we'll see. More of a reason to get a model piece fabricated. Again, no rush.
This is really fun, sort of like a Chinese puzzle of sorts
Thanks again,
Albert
|
Re: Modding an Explorer or E-Trac to make it lighter October 28, 2012 08:22PM |
Registered: 14 years ago Posts: 8,155 |
Hey Albert Heres a MOD I am working on...Its uses the Xterra handle....I welded a piece to the top..
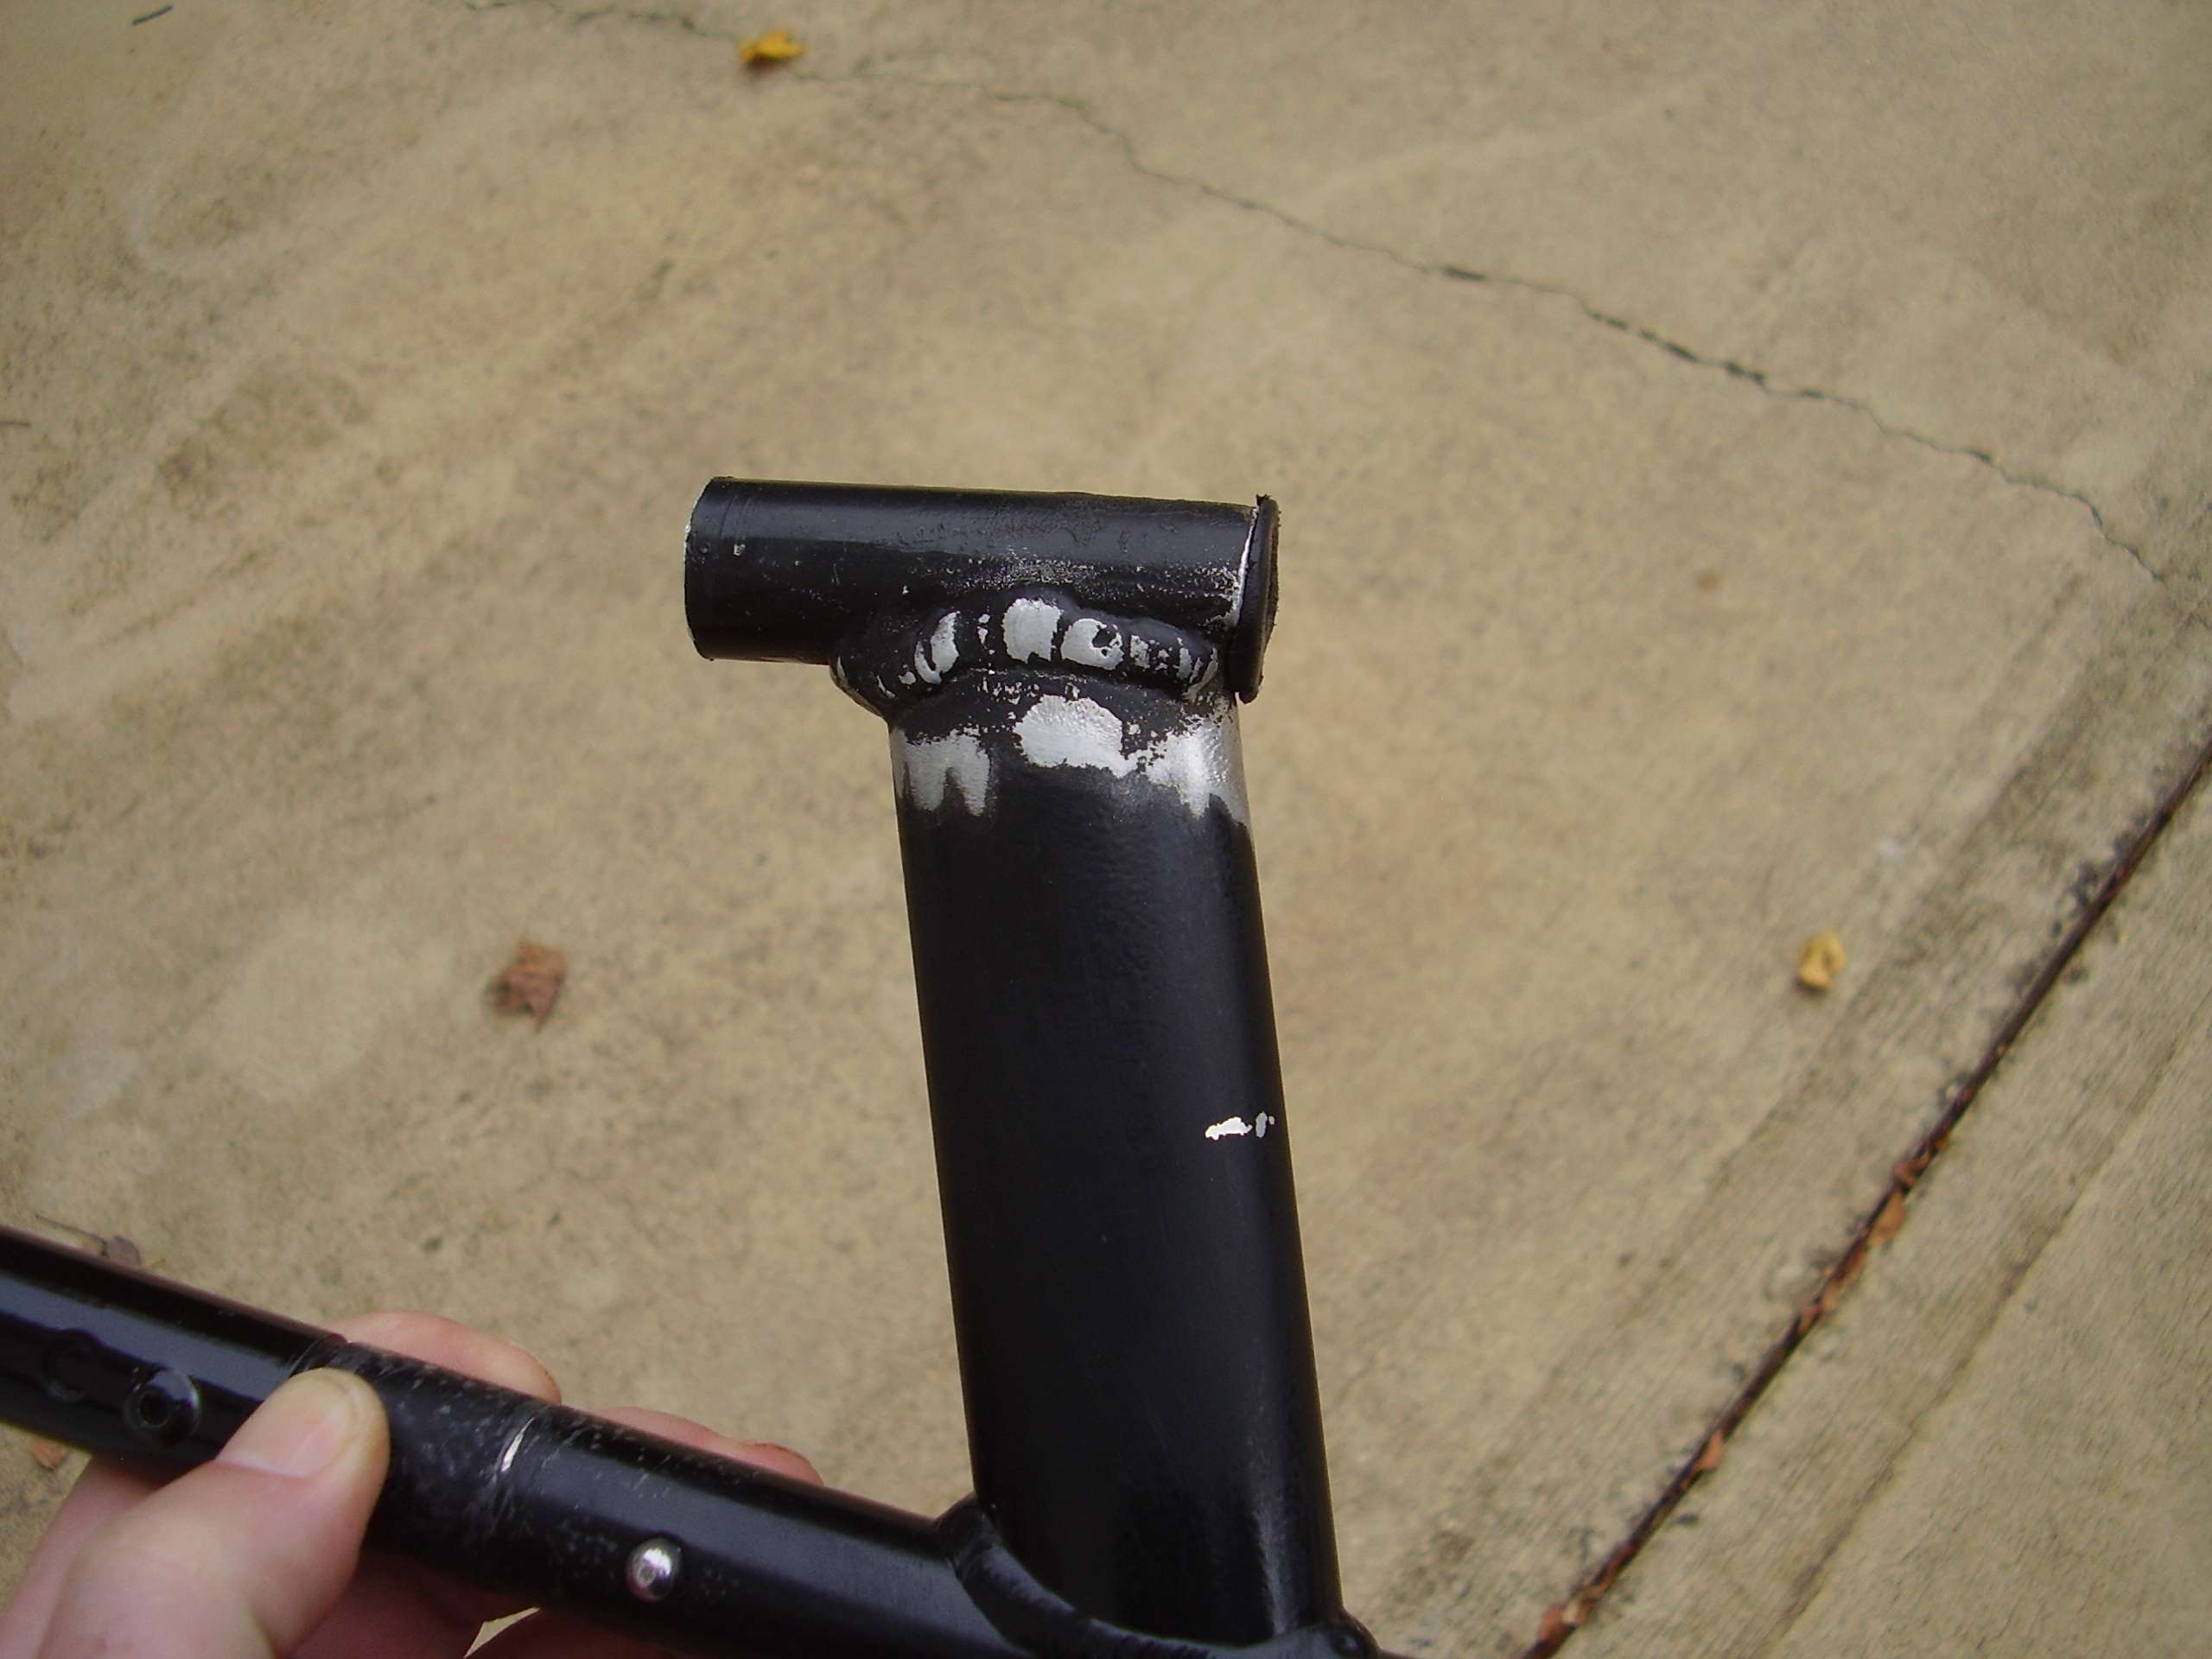
If I was doing an explorer I would get a piece of the square tubing the middle rod uses and weld it to the top of the handle then slide housing onto it...
Build it right and you could use the camlock to hold it on the shaft...

If I was doing an explorer I would get a piece of the square tubing the middle rod uses and weld it to the top of the handle then slide housing onto it...
Build it right and you could use the camlock to hold it on the shaft...
|
Re: Modding an Explorer or E-Trac to make it lighter October 29, 2012 08:13PM |
Registered: 12 years ago Posts: 360 |
Earthmansurfer, impressive range of modifications and great documentation for others who wish to follow in your footsteps. Nothing makes me more happy than to see people mod stuff, and not just detectors. Keep it up my friend. You are doing a great service to all those FBS users are there who want a light weight machine that Minelab wouldn't listen about and build.